27/09/2013 by 3rd Bit FTR
OK, so it’s another story about paint stripping. If you can’t be bothered reading it, at least enjoy the slideshow at the end.
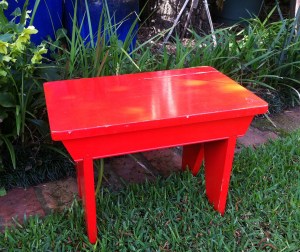 I seem to have picked the simplest job ever for demonstrating how to strip paint off furniture. This old stool had just 1 coat of red paint. That’s it. Not even an undercoat.
I bought it from Bay Country Antiques in Waipawa, New Zealand (and got it home in my suitcase). The wood is probably rimu (Dacrydium cupressinum), according to the guy in the shop. Don’t ask me, I only know kauri.
Continue Reading »
Posted in Furniture | Tagged Danish oil, metho, methylene chloride, paint scrapers, paint stripper, paint stripping, restore, rimu, steelwool, stool | 8 Comments »
09/09/2013 by 3rd Bit FTR
I’m not sure if this is supposed to be a ‘how-to’ post or a show-and-tell story.*
We’re getting four of our five leadlight windows completely replaced in a few weeks, and the existing window ledges all needed to be stripped, sanded, filled, sanded, undercoated and sanded ahead of the new windows going in.
Our leadlight windows are lovely – from a distance.
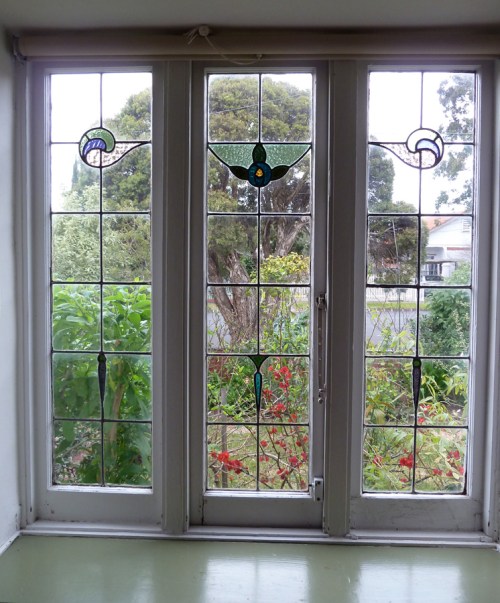
Up close they’re a mess. That’s why we’re paying someone for new ones.
Continue Reading »
Posted in House renovation work | Tagged leadlight windows, paint stripping, sanding, undercoating, window ledge, window sill, wood fillers | 2 Comments »
13/06/2013 by 3rd Bit FTR
[read Part 1]
Here are my instructions for making rash vests. There’s nothing too complicated about them.
What you need

- A piece of lycra fabric (two-way stretch fabric with 75% stretch)
- A pattern (see Part 1 for details)
- An overlocker (mine’s a 4-thread machine)
- Two reels of woolly nylon thread and two of normal polyester thread
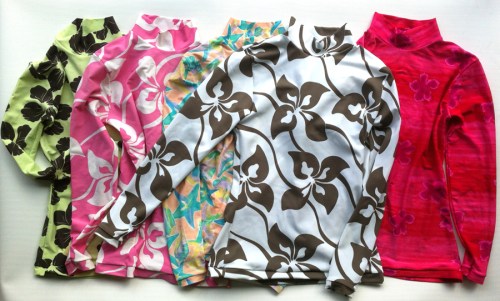
I’ve added this photo to show how brilliant a rash vest is when you’re snorkelling in tropical waters. Actually I’ve really only used it to add some colour to the page; the rest of the photos are all very duotone.
Continue Reading »
Posted in Sewing, Swimming | Tagged lycra, lycra top, overlocker, rash vest, stretch fabric, woolly nylon thread | 3 Comments »
04/06/2013 by 3rd Bit FTR
I really don’t enjoy getting into outdoor swimming pools on cold mornings – winter or summer. So I wear tight-fitting, long-sleeved lycra rash vests over my bathers, at least until I’ve warmed up.
I started making my own about 13 years ago. One or two a year, plus quite a few for friends … maybe 25–30 so far. Therefore, speaking as the expert I obviously am, let me tell you a thing or two about sewing rash vests.
This part is a bit of an overview. In Part 2 I walk through the steps for making a rash vest.
The aim
The rash vest needs to fit really firmly through the wrists, arms and the bodice so it doesn’t create a lot of drag in the water while you’re doing laps. It doesn’t matter so much if it’s not tight around hips because it’ll ride up a bit no matter what.
Continue Reading »
Posted in Sewing, Swimming | Tagged lycra, lycra top, rash vest, surf, tight fit | 10 Comments »
28/04/2013 by 3rd Bit FTR
About 20 years ago I did an 8-part French polishing course. The instructor was a real craftsman, and he covered more ground than just ‘Applying Shellac for Dummies’. Most of the techniques I use for stripping and finishing furniture are ones I learned from him. This is what he taught me about applying beeswax.
Beeswax gives a more sympathetic, though slightly duller finish than French polishing – and it makes the surface a bit more waterproof.
 It’s best to make up your own beeswax to ensure its purity. Avoid any commercial products that aren’t pure (for example, ones that have paraffin added to them).
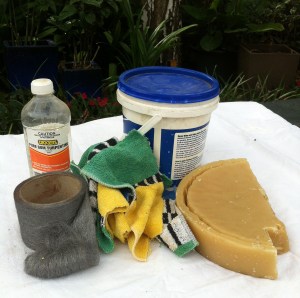
What you need:
- a lump of beeswax
- pure turpentine (or mineral turps will do)
- a container to put the wax in
- fine steelwool (000 grade)
- old cotton towelling (not flat-weave cloth) cut up into rags
Continue Reading »
Posted in Furniture | Tagged beeswax, pure turpentine, steelwool | 9 Comments »
14/04/2013 by 3rd Bit FTR
Over Easter we finally got around to moving some stuff out of the garage and into the roof space. It’s so clean and tidy up there these days it makes me proud to be, er, a perfectionist.
Mid-2011 was roof re-tiling time. Our terracotta tiles were brittle and the roof leaked during heavy rain. And the whole roof frame needed strengthening and straightening. And the old insulation had to be cleared out, and the ceiling surface vacuumed and tidied before new insulation could be put down. The project was finally wrapped up in January 2012. Gotta love the scheduling blowouts on what you think is a quick home renovation project.
Job number 1 was installing attic stairs because getting everyone up into the roof via the small hole above the shower was never going to work. Roof tilers, structural engineer, builders, insulation guys, electrician … and us.
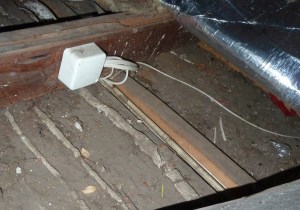 The roof space was absolutely disgusting. Ninety years of fine dust and muck covered every surface.
Call us mad but the first thing we did after the stairs went in was to sweep the dust off every roof beam. We suited-up in full breathing masks, goggles, overalls and gloves. These photos give you some idea of what we were dealing with.
Continue Reading »
Posted in House renovation work | Tagged industrial vacuum, insulation, retiling roof, roof, sarking, strengthening roof frame | 5 Comments »
06/04/2013 by 3rd Bit FTR
I haven’t written about any sewing projects since the denim skirt episode. Which is not to say I haven’t been sewing. I have; I just couldn’t be bothered telling anyone.
Over the past few weeks I’ve made four identical skirts. Five if you count the toile. Not all the same fabric, don’t be ridiculous, it’s not a corporate uniform. Four different pieces from Darn Cheap Fabrics – three were only $10/metre, the fourth was a bit more pricey. Cheap skirts when you consider I only needed a metre for each one, plus a bit of lining and a zip.
 Here’s the Vogue pattern (no. 2863; click to see a larger version). The main aim of this style of skirt is to have it fitting nicely on the waist so it doesn’t slip down towards the hips. When it works, it means you can wear a wide belt over the top and not have to worry about yanking the skirt back up every 10 minutes.
Continue Reading »
Posted in Sewing | Tagged fitted skirt, pattern, sewing, skirt | 2 Comments »
09/03/2013 by 3rd Bit FTR
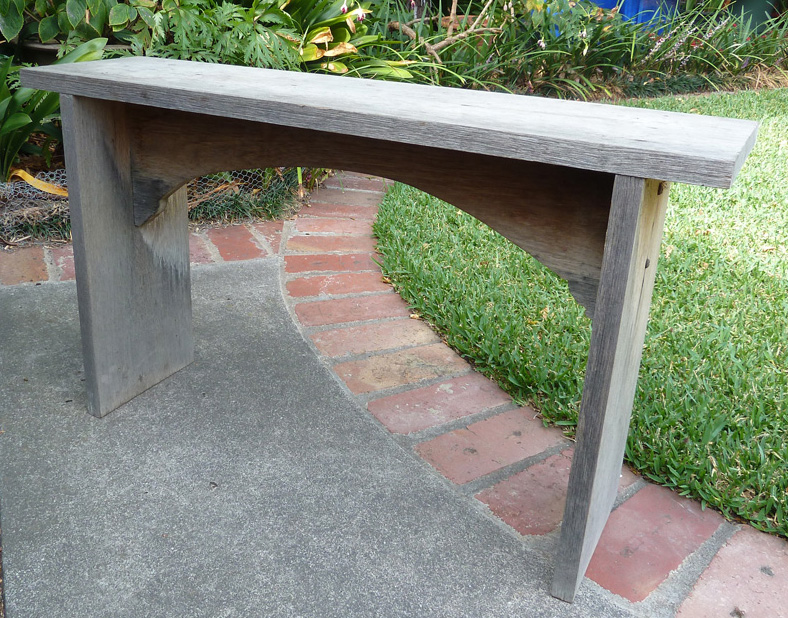
It’s been a nice change working on a piece of furniture that didn’t need pulling apart and rebuilding. The bench seat I bought in Inverloch just needed sanding, oiling and waxing. Although, really, a lot of sanding, followed by a sore neck and sore shoulders.
The seat was superficially weathered but it was really sturdy. It had come from a deceased estate down Inverloch way and, given that there were a number of homemade pieces among the contents, the owner must have been into making furniture out of second-hand timbers.
The timber’s definitely blackwood (Acacia melanoxylon) – the colour and the grain are wonderful. (Here’s some info on blackwood on the Victorian Department of Primary Industries website.)

Then …
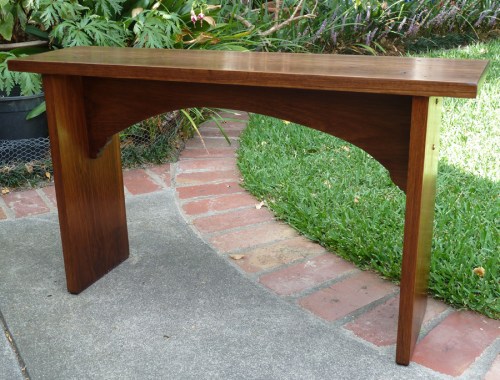
… and now
Posted in Furniture | Tagged beeswax, bench seat, Danish oil, Inverloch, orbital sander, restore, sandpaper, second-hand | Leave a Comment »
10/02/2013 by 3rd Bit FTR
Inverloch on a warm weekend in February is pretty fantastic, as I’ve just discovered. Swimming along the inlet on an incoming tide made me feel like a sprint specialist. (If you could see the video footage you’d agree; it was like cheating.) And diving under big dumping waves at the surf beach on Saturday afternoon brought back vivid teenage memories of riding scary waves on surf mats at Portsea and Gunnamatta.
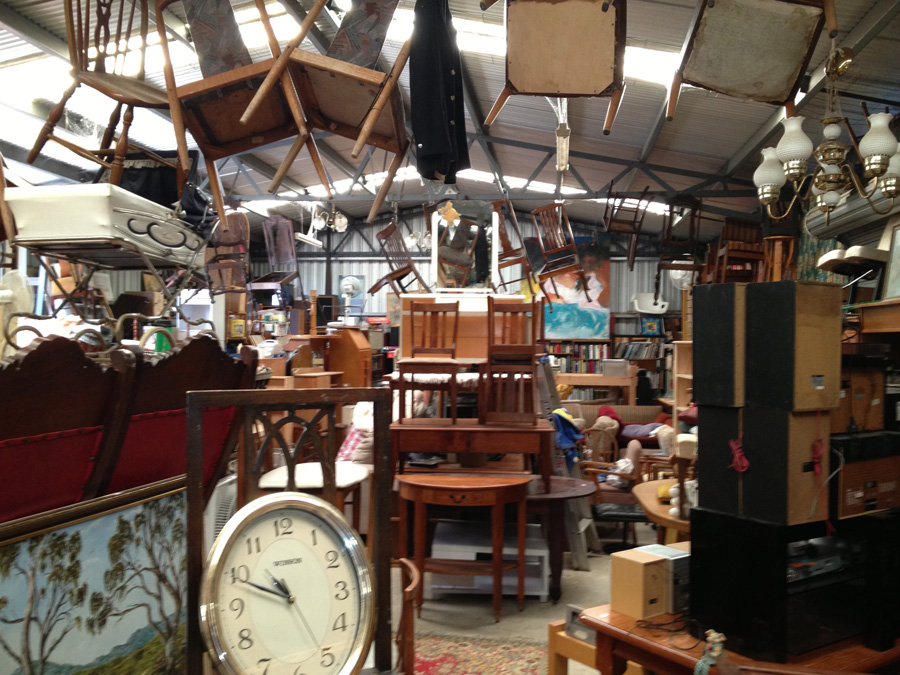
Driving out of town late this morning it was pure serendipity that led us to an excellent second-hand place. We were looking for one particular store but we turned down the wrong street and found something even better – the Inverloch Bargain Centre. What a place! Not much to look at from the street. In fact it’s pretty junky – old bikes, broken furniture and rough sheds stuffed with tables with no tops and chairs with two legs. Inside the main building it got much better. Floor to ceiling excitement for those of us who like a restoration project.

I bought a simple bench seat for $20. It looks like it’s been left out in the weather – the timber’s all silvery grey and the grain is quite open. It’s possibly blackwood, which would be brilliant, and it’s also incredibly heavy. Some serious work with the orbital sander is coming up, maybe next weekend. Of course, I’ve got no idea where I’m going to put the thing when I’m done. (Have a look at the final result.)
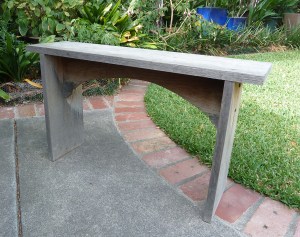
If you’re down Inverloch way, check out the Inverloch Bargain Centre at 36 Bear Street. (The other second-hand furniture place is in nearby Cashin Street. Worth a look but much more expensive and most of the furniture has already been restored, which is no fun at all really.)
Posted in Furniture | Tagged bench seat, Inverloch, restore, second-hand | 3 Comments »
10/01/2013 by 3rd Bit FTR
[read Part 1]
Here’s the second half of the chair restoration story. I took a lot of photos and I’m gonna use them.
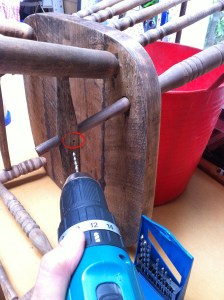
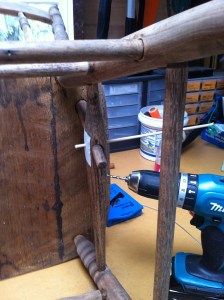
Using dowel plugs to strengthen a join
The chair had originally been nailed at the two points where the long outer uprights of the chair back passed through the side rungs. The nails would have helped hold the uprights in position. I didn’t want to use nails again. Instead I used dowels. Dowels can easily be drilled out if the chair needs repairing at some time in the future. Removing nails just makes a mess. The person who built the chair should have got a rap over the knuckles.
This is what I did:
- drilled a hole right through each rung and upright
- glued in pieces of 4 mm dowel and then trimmed them
- filled the hollow on the inside of the rungs with melted wax, using a soldering iron, then scraped off the excess wax and rubbed it smooth
- sanded the dowel ends flush on the outside of the rungs
Continue Reading »
Posted in Furniture | Tagged chair, dowel, restore | 8 Comments »
« Newer Posts - Older Posts »